
Pruning
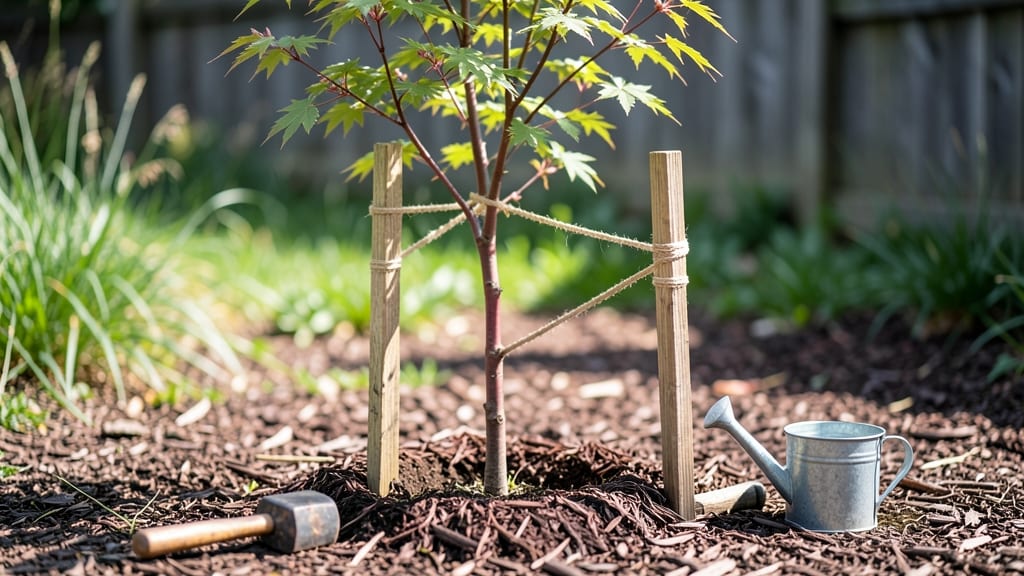
Staking a tree with just two stakes keeps it steady without smothering its growth—this method has saved my young fruit trees from bending over in every windstorm. 🌳 The key is positioning the stakes diagonally, 18-24 inches from the trunk, to create a natural triangle of support that mimics how trees sway in the breeze.
Too many stakes or tight ties actually restrict trunk thickening, so we’re keeping it simple with this proven approach.
You’ll need two 4- to 6-foot wooden or metal stakes, soft tree ties (no wire—it cuts bark), and a small shovel for digging holes. Hardware cloth wrapped around the trunk prevents rodent damage, and a pruning saw comes in handy if you need to adjust stakes later.
The goal is temporary support: these stakes should stay for 1-2 years max, until the roots establish enough to stand alone.
Start by digging holes at a 45-degree angle, just deep enough to hold the stakes firmly but not so deep they rock. Attach the ties loosely—you can tighten them as the tree grows, but never restrict the trunk’s natural movement.
The stakes should form a V shape, with the top tied together just below the tree’s first branch. This setup lets the tree lean slightly, which actually strengthens its stem over time.
Common mistakes include using stakes that are too short (they’ll topple) or ties that are too tight (they strangle the trunk). Check the ties every few months—they’ll need adjusting as the tree grows.
And remember: staking isn’t just for windy areas. Young trees, newly transplanted specimens, or those in heavy clay soil all benefit from this lightweight support system.
📚 In This Guide
- What you need
- Instructions
- Tips and common mistakes
- Wrapping up and next steps
What you need
- ● 2 sturdy tree stakes: Made of wood (cedar or fir) or metal, 4–6 feet tall and 1–2 inches in diameter. Opt for treated wood to prevent rot.
- ● Tree tie or soft garden tape: 3–4 feet long, stretchy but strong (e.g., polypropylene or jute—avoid wire, which can damage bark).
- ● Mallet or hammer: For driving stakes into the ground (a rubber mallet is gentler on stakes).
- ● Measuring tape or ruler: To ensure stakes are placed at the right distance from the tree trunk.
- ● Shovel or post-hole digger: To create holes for the stakes (depth: 1/3 of stake length).
- ● Gloves: Heavy-duty work gloves to protect your hands from splinters or rough bark.
- ● Stake anchors or rebar: For extra stability in windy areas (drive into the ground before inserting stakes).
- ● Tree guard or collar: Protects the trunk where ties touch (especially for young or delicate trees).
- ● Water-based wood sealant: If using untreated wood stakes, seal them to extend lifespan.
- ● Pruning shears: For trimming any low-hanging branches that might interfere with staking.
Step-by-Step instructions for staking a tree with 2 stakes
Here's the foolproof method I use to support young trees without restricting growth.
🪴 Step 1: Choose the Right Stakes and Location
Select two 4-6 foot long wooden or metal stakes—thick enough to stay upright but thin enough to drive into the soil without splitting. I always use 1-inch diameter bamboo stakes because they're lightweight and strong. Position them on opposite sides of the tree, about 6-12 inches from the trunk, angled slightly outward from the base.
The stakes should form a triangle with the tree's trunk. Drive them 12-18 inches deep into the soil so they don't lean or wobble. I tap them in with a mallet until only 6 inches remain above ground—this gives enough height to attach the support without crowding the trunk.
🌱 Step 2: Attach the Support System
Use soft, flexible tree ties or strips of old t-shirt fabric (cut into 2-inch wide strips) to connect the stakes to the tree. I avoid wire or plastic ties—they can cut into the bark as the tree grows. Loop one end of the tie around the upper part of each stake, about 12-18 inches above the ground, then cross them behind the tree trunk.
Secure the ties loosely around the trunk, leaving 1-2 inches of space between the tie and bark. The goal is to stabilize the tree without restricting its natural movement. You'll see gentle swaying in wind—that's good! Too much rigidity can weaken the trunk over time.
☀️ Step 3: Secure the Stakes to the Ground
Spread the stakes outward slightly to create a wider base of support. I dig a small trench around each stake's base to anchor it deeper, then fill with soil to secure. For extra stability in windy areas, tie the stakes together at the top with a third piece of fabric or a short piece of rope, creating a loose triangle.
Check the tension weekly—ties loosen as the tree grows. Adjust so the tree remains upright but can still sway slightly. This movement strengthens the trunk naturally. If the stakes shift, re-secure them immediately, especially before storms.
⏰ Step 4: Monitor and Adjust as the Tree Grows
After 6-12 months, check if the tree can stand without support. Gently remove one stake first, then observe for 2-4 weeks—if the tree stays upright, remove the second stake. I usually leave support for 1-2 growing seasons, depending on the species and wind exposure.
Watch for signs of restriction: if the trunk shows indentations from ties or the tree leans heavily, adjust immediately. The stakes should only provide temporary guidance, not permanent structure. Once the tree's root system establishes, it won't need them anymore.
Tips & tricks for perfect tree staking with 2 stakes
Here's what nobody tells you about getting it right the first time.
Stake Selection: The 1-inch diameter bamboo stakes I recommend are ideal because they're sturdy yet flexible enough to bend slightly in wind without snapping. For heavier trees, consider metal stakes—they won't rot like wood, but they're heavier to drive into the ground. Always check for straightness before planting; even slight bends can create uneven pressure on the tree trunk.
Tie Placement: In Step 2, when attaching the ties, position them about 12-18 inches above the ground—this height prevents wind from rocking the tree too aggressively at its base. I've seen people tie too high, which can actually make the tree more unstable. The ties should cross behind the trunk, forming an "X" shape, to distribute pressure evenly.
Wind Resistance: The loose triangle formation in Step 3 is crucial for windy areas. When you tie the stakes together at the top, leave enough slack so the tree can sway naturally—this movement actually strengthens the trunk over time. If you make the triangle too tight, you're essentially creating a rigid structure that can snap in a storm.
Growth Monitoring: The 6-12 month timeline in Step 4 is a guideline, not a rule. Some fast-growing species like willows may be ready for stake removal after just 6 months, while slower-growing trees like oaks might need support for 2-3 years. Always check for trunk indentations from ties—if you see them, the ties are too tight and need adjusting immediately.
Pro Tips for Stake A Tree With 2 Stakes
- Here's what nobody tells you about getting it right the first time.
- Stake Selection: The 1-inch diameter bamboo stakes I recommend are ideal because they're sturdy yet flexible enough to bend slightly in wind without snapping.
- Tie Placement: In Step 2, when attaching the ties, position them about 12-18 inches above the ground—this height prevents wind from rocking the tree too aggressively at its base.
Frequently asked questions
Got questions about staking your tree the right way?
You’re not alone—here are the most common concerns and straightforward answers to help you get it done like a pro.
Why do I need to stake a tree with only 2 stakes?
Two stakes provide just enough support to stabilize the tree without restricting its natural movement or causing girdling (where the stake digs into the bark). This mimics gentle wind training while preventing over-dependence on the stakes. Think of it as a lightweight brace—enough to guide growth, not smother it!
How long should I leave the stakes on the tree?
Most trees only need stakes for 6–12 months, depending on species and soil conditions. Check the tree’s stability monthly: if it wobbles easily when you tug gently, leave the stakes on. If it stands firm on its own, it’s time to remove them to encourage root strength. Pro tip: Stakes left too long can weaken the trunk!
What if my tree leans badly—can 2 stakes fix it?
Two stakes work best for moderate lean (under 30 degrees). For severe tilts (45°+), consider 3 stakes in a triangular pattern or a tree brace for extra support. If the lean is due to poor rooting, focus on soil health first—amend compacted soil with compost before staking.
What’s the best material for stakes—wood, plastic, or metal?
Wood (cedar or fir)
is ideal—it’s breathable, biodegradable, and won’t damage roots as it decomposes. Plastic stakes are reusable but can trap moisture (risking rot). Metal stakes are durable but may conduct heat/cold to the trunk. Avoid treated wood with chemicals that could harm the tree.
My tree’s bark is rubbing against the stake—what do I do?
This is called girdling, and it can strangle the tree by cutting into the bark. Act fast:
- Loosen the tie or remove the stake immediately.
- Wrap the rubbed area with tree bandage or burlap to protect it.
- Adjust the stake position so it’s 2–3 inches from the trunk and padded with rubber or cloth.
Do I need to stake in windy vs. calm conditions?
Staking is most critical in windy areas—the stakes help prevent uprooting during storms. In calm conditions, use stakes only if the tree is top-heavy or freshly planted. Always bury stakes 1/3 of their length and angle them outward for stability, regardless of weather.
Wrapping up and next steps
Staking a tree with just two stakes is a simple yet effective way to support young trees while encouraging strong root development.
By following the steps above—positioning stakes at the right angle, securing them gently, and monitoring growth—you’ll give your tree the best chance to thrive without over-reliance on artificial support.
You’ve got this! 🌱 Now that your tree is staked, keep an eye on it and adjust as it grows. Next, consider learning how to prune for optimal shape or explore seasonal care tips to keep your tree healthy year-round.