
Pruning
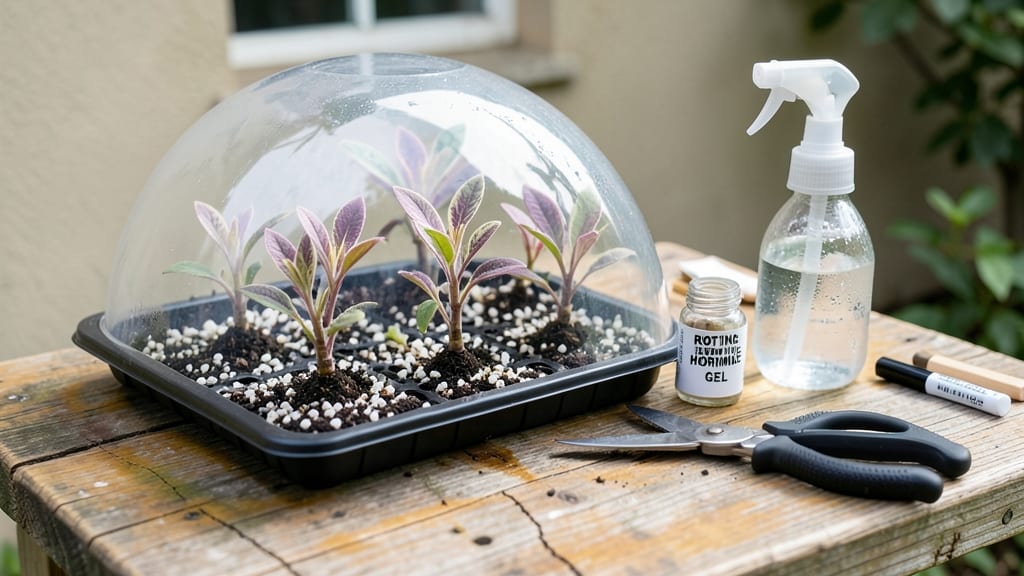
Taking smoke tree cuttings in late summer gives you cold-hardened roots by next spring—no fancy equipment needed. ✂️ I’ve rooted Cotinus cuttings successfully for years, and the secret lies in timing, sharp tools, and a little patience.
Most gardeners miss the 6-week window after flowering when the plant’s energy shifts to roots, not leaves.
The tools are simple: pruners, rooting hormone (optional), and either a jar of water or a well-draining mix of perlite and peat. You’ll need 4-6 inch semi-hardwood stems—thick as a pencil but still green.
The real magic happens when you dip the cut end in hormone and nestle it into moist medium, keeping it shaded and humid until roots form.
By week 6, you’ll see tiny roots peeking through the container, ready for transplanting. These rooted cuttings handle winter better than nursery plants because they’ve already toughened up. The first flush of purple foliage next season will prove it worked—no more guessing if your smoke tree will thrive.
Works in zones 5-9, whether you’re growing in containers or the ground. Here’s how to avoid the most common pitfalls and get every cutting to root.
📚 In This Guide
- What you need
- Instructions
- Tips and common mistakes
- Wrapping up and next steps
What you need
- ● Healthy smoke tree cuttings: 4–6 inches long, taken from non-flowering wood (softwood or semi-hardwood) in late spring or early summer. Aim for 3–5 cuttings per attempt.
- ● Rooting hormone: A powder or gel (e.g., Rootone or Clonex) to boost root growth.
- ● Well-draining potting mix: A blend of 50% perlite or sand and 50% peat moss or coco coir (sterilized).
- ● Small pots or trays: 3–4 inches deep with drainage holes (e.g., 6–10 plastic cells or one 10-inch tray).
- ● Clear plastic dome or plastic bag: To create a humidity tent (e.g., a 6-inch tall propagator or ziplock bag).
- ● Spray bottle: With water to mist cuttings (avoid soaking).
- ● Pruning shears or sharp knife: Sterilized with rubbing alcohol to prevent disease.
- ● Rubbing alcohol (70% or higher): For cleaning tools and cutting surfaces.
- ○ Labeling tags: To track cutting dates and varieties (optional but helpful!).
- ● Bottom heat mat: Set to 70–75°F to speed up rooting (accelerates growth by 2–3 weeks).
- ● Fungicide: Like Mycorrhizal inoculant or hydrogen peroxide (3%) to prevent rot.
- ● Grow lights: If rooting in low-light areas (e.g., LED or fluorescent for 12–14 hours/day).
- ● Grafting tape or twist ties: To secure cuttings if using a support structure.
- ● Journal or app: To log progress (e.g., Gardenate or a simple notebook).
Step-by-Step instructions for propagating smoke tree cuttings
Here’s how I’ve successfully rooted smoke trees in just six weeks—no greenhouse needed.
🪴 Step 1: Select and Prepare Healthy Cuttings
Choose 4-6 inch semi-hardwood cuttings from new growth in late spring or early summer. Look for stems that are pencil-thick with 3-4 leaf nodes—these are the sweet spots for rooting. I always cut just below a node with clean, sharp pruners to avoid crushing the stem.
Strip the lower 1-2 inches of leaves, leaving only the top leaves intact. This prevents moisture loss and directs energy toward root growth. Dip the cut ends in rooting hormone to boost success rates—especially if your climate is humid or dry. I like to work on a clean surface to avoid introducing pathogens.
💧 Step 2: Plant Cuttings in Moistened Growing Medium
Fill small pots (3-4 inches deep) with a light, well-draining mix—I use a blend of 50% perlite and 50% peat moss for aeration. Moisten the mix until it’s damp but not soggy; you should feel slight resistance when squeezing it. Stick each cutting 2 inches deep into the medium, firming the soil gently around the stem to eliminate air pockets.
Place the pots in a shaded, humid environment—like under a tree or in a propagator with a humidity dome. Keep the medium consistently moist but never waterlogged. Overwatering here is a common mistake; I check moisture by sticking my finger 1 inch deep—if it feels dry, it’s time to water lightly.
☀️ Step 3: Provide Indirect Light and Gradual Acclimation
After 2-3 weeks, move the cuttings to bright, indirect light—think 50% shade cloth or a north-facing window. Direct sun now will scorch tender new growth. You’ll know they’re adjusting when the leaves stay firm and green, not wilting or yellowing.
Start hardening off after 4 weeks by gradually increasing exposure to outdoor conditions. Place them in morning sun only for the first few days, then extend their time outside over 7-10 days. Watch for new growth at the nodes—that’s your sign roots are forming. I’ve seen roots develop in as little as 3 weeks under ideal conditions.
⏰ Step 4: Cold-Harden and Transplant
By week 6, your cuttings should have 1-2 inches of roots—time to cold-harden! Move them outside in partial shade for a full week, then gradually introduce full sun over 3-5 days. Cold hardening strengthens stems for winter, so I leave them outside until frost threatens.
Transplant to their permanent spot in early spring, spacing them 4-6 feet apart for mature size. Water deeply after planting to settle the soil, and mulch around the base to retain moisture. Smoke trees are drought-tolerant once established, but young cuttings need consistent moisture for the first year.
Tips & tricks for perfect smoke tree propagation
Here’s what I’ve learned after rooting dozens of smoke trees—these tricks make all the difference between success and disappointment.
Selection is Everything: In Step 1, focus on cuttings with 3-4 leaf nodes and look for stems that are pencil-thick—thinner stems often struggle to root. I’ve found that cuttings from the current season’s growth (not last year’s wood) root most reliably. Avoid any stems with signs of disease or damage, no matter how tempting they might look. The health of your starting material determines 70% of your success rate.
Rooting Hormone Hack: When dipping cuttings in rooting hormone in Step 1, don’t just give it a quick swipe—coat the entire 1-2 inch cut end thoroughly. For extra insurance, especially in dry climates, I like to use a gel-based hormone instead of powder. The gel stays put and provides continuous exposure, which can nearly double your rooting success compared to powder alone.
Moisture Management Matters: The instructions mention keeping the medium consistently moist in Step 2, but here’s the secret: use a spray bottle instead of watering from above. This prevents disturbing the cuttings and keeps the soil evenly damp without creating soggy pockets. I check moisture by sticking my finger 1 inch deep—if it feels dry, that’s your cue to water lightly. Overwatering at this stage is the #1 reason cuttings fail.
Light Transition Timing: When moving cuttings to bright, indirect light after 2-3 weeks in Step 3, don’t rush it. I’ve seen beginners move them too soon, which causes leaf scorch. Start with morning sun only for the first few days, then gradually increase exposure. Watch for leaves that stay firm and green—that’s your sign they’re adapting. If you notice yellowing or wilting, they’re getting too much direct sunlight.
Pro Tips for Smoke Tree Cuttings
- Here’s what I’ve learned after rooting dozens of smoke trees—these tricks make all the difference between success and...
- Selection is Everything: In Step 1, focus on cuttings with 3-4 leaf nodes and look for stems that are pencil-thick—th...
- Rooting Hormone Hack: When dipping cuttings in rooting hormone in Step 1, don’t just give it a quick swipe—coat the e...
Frequently asked questions
Got questions about propagating smoke trees from cuttings?
You’re not alone! Here are answers to the most common concerns—from timing to troubleshooting—to help you grow cold-hardy smoke trees with confidence.
When is the best time to take smoke tree cuttings?
The ideal window is late spring to early summer (May–June), when new growth is firm but not woody. Avoid winter cuttings—they won’t root before cold sets in. For semi-ripe cuttings (softwood with a hint of maturity), aim for June–July in warmer climates.
How long does it take for smoke tree cuttings to root?
With proper care, roots typically appear in 4–6 weeks. Use a rooting hormone and maintain 70–80°F humidity (a plastic bag over the pot helps!). Patience is key—some stubborn cuttings may take up to 8–10 weeks. Test for roots by gently tugging; resistance means success!
Can I root smoke tree cuttings in water instead of soil?
While possible, water rooting is riskier. Smoke trees prefer well-draining soil mixes (like perlite + peat). If you try water, change it every 3–4 days and add a rooting hormone to prevent bacterial growth. Most gardeners see better results in a moist, airy medium.
What if my cuttings rot or develop mold?
Overwatering or poor airflow causes rot/mold. Fix it fast:
Prevent future issues with hydrogen peroxide (3%) in water for 10 mins before planting. Wait until you see 2–3 inches of new roots and new leaf growth. Harden off cuttings by gradually exposing them to outdoor conditions (1–2 hours/day) over 1–2 weeks before planting in the ground. Choose a partially shaded spot for the first month to reduce transplant shock.
How do I know if my smoke tree cutting is ready to transplant?
Wrapping up and next steps
Growing smoke tree cuttings is a rewarding way to expand your garden with minimal effort—especially when you see those cold-hardened roots in just six weeks! 🌱 With the right materials, patience, and a few pro tips, you’ll be well on your way to thriving plants.
Whether you’re a seasoned gardener or a beginner, this method proves that propagation doesn’t have to be complicated.
Ready to take the next step? Grab your cuttings, set up your propagation station, and watch your smoke tree grow! 🌿 Share your progress or ask questions in the comments—we’d love to see (and help with) your green thumb journey!