
Pruning
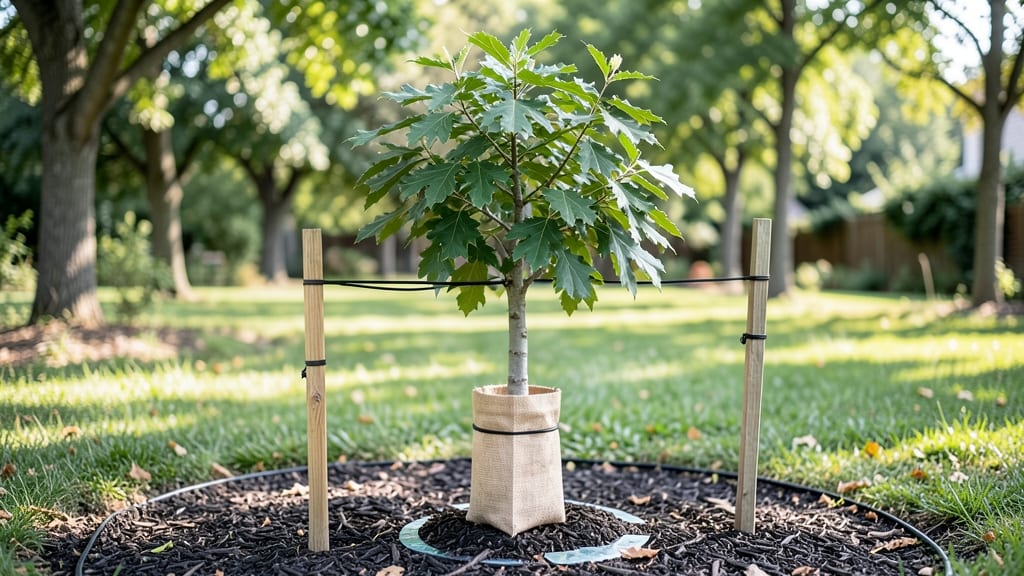
Your new tree’s first five years determine whether it thrives for decades—or gets girdled by rabbits, scorched by sun, or choked by weeds. 🌳 New tree protection isn’t just about wrapping a trunk; it’s a layered defense system that shields roots, bark, and growth from everything nature (and critters) can throw at it.
I’ve seen firsthand how a simple tree guard and mulch ring can mean the difference between a 10-foot oak and a sapling with a chewed trunk.
The key is combining physical barriers (like hardware cloth and tree wraps) with smart watering and mulching—no fancy tools, just the right setup to give your tree the fighting chance it deserves.
By the end of this, you’ll have a system that keeps pests out, moisture in, and sunlight at bay where it matters.
Your tree will grow straighter, stronger, and with fewer scars—because the first few years are when they’re most vulnerable, and you’re the only one who can give them a real head start.
The best part? This works for any tree—fruit, shade, or ornamental—and adapts to your climate. Let’s build that protection before the first storm or hungry critter shows up.
📚 In This Guide
- What you need
- Instructions
- Tips and common mistakes
- Wrapping up and next steps
What you need
- ● Burlap or Landscape Fabric: 10–20 ft (depending on tree size); biodegradable, 3–5 mm thick.
- ● Tree Guards (Plastic or Metal): 2–4 units; adjustable height (4–6 ft), sturdy, and UV-resistant.
- ● Stakes or Rebar: 4–6 pieces; 1.5–2 ft long, galvanized for longevity.
- ● Heavy-Duty Zip Ties or Straps: 10–15; nylon, ¼–½ inch wide.
- ● Mulch (Organic): 2–3 bags; shredded bark or wood chips, 2–4 inches deep.
- ● Root Barrier Material: 1 roll; HDPE plastic (½ inch thick) or corrugated metal.
- ● Utility knife or box cutter (for cutting fabric/barriers).
- ● Post-hole digger or auger (for stakes).
- ● Measuring tape.
- ● Heavy-duty gloves.
- ● Hammer or mallet (for securing stakes).
- ● Reflective Tape: For high-traffic areas (e.g., near roads).
- ● Wire Mesh: Extra protection against rodents or deer (attach to guards).
- ● Soil Stabilizer: For slopes (e.g., erosion control fabric).
- ● Solar-Powered Lights: To deter nighttime damage.
Step-by-Step instructions for protecting a newly planted tree
Here’s how to shield your young tree’s roots and trunk from damage and pests—tested methods that work for any species.
🪴 Step 1: Install a Root Protection Barrier
Start by creating a physical boundary around the tree’s root zone. Use a 4-foot diameter circle of hardware cloth (1/4-inch mesh) buried 6 inches deep and extending 12 inches outward from the trunk. This keeps gophers and voles from tunneling under the soil surface. Bend the top edge outward slightly to discourage digging animals from climbing over.
For larger trees or high-risk areas, add a second layer of burlap around the hardware cloth. Secure it with landscape staples, leaving the top loose so water can penetrate. This extra barrier adds an extra line of defense against burrowing pests. Real talk: Skipping this step means you’ll likely lose the tree to rodents within a year.
☀️ Step 2: Wrap the Trunk for Physical Defense
Next, protect the trunk from sunburn, lawnmower damage, and animal gnawing. Use tree guard wrap (available at garden centers) or cardboard tubes cut to fit snugly around the trunk. For young trees, a single layer is enough, but wrap it 2 feet high to cover the vulnerable lower trunk where rodents chew.
Secure the wrap with landscape fabric tape—never wire or staples, as they can gouge the bark. Leave a 1-inch gap at the bottom to allow airflow and prevent moisture buildup. If using cardboard, coat it with white latex paint to reflect sunlight and prevent scorching. Here’s the thing—if the wrap stays on for more than a year, it’s doing its job too well. Remove it annually to check for damage.
🌱 Step 3: Create a Mulch Ring for Root Health
Spread 3 inches of organic mulch (wood chips or straw) in a 3-foot diameter circle around the base, keeping it 6 inches away from the trunk. This insulates roots, retains moisture, and blocks weeds. Avoid piling mulch against the trunk—this creates a damp, rot-prone environment. Instead, create a doughnut shape that slopes gently outward.
Refresh the mulch every spring to maintain its protective layer. Over time, it breaks down and needs replenishing. You’ll notice healthier soil and fewer weeds once this ring is in place. Just don’t overdo it: More than 4 inches of mulch can suffocate roots by blocking oxygen.
✂️ Step 4: Add a Stake (If Needed) for Stability
Only stake the tree if it’s top-heavy or in a windy area. Use two stakes placed 6 inches from the trunk at opposite angles, tied loosely with rubber tree ties (not wire). The goal is to support the tree without restricting its natural movement—roots need to flex to strengthen. Adjust the ties every 2-3 months as the trunk grows.
Remove stakes after 1-2 years—longer staking weakens the trunk by preventing it from developing its own stability. If the tree sways slightly in the wind, that’s normal and actually helps it grow stronger. I’ve seen too many trees permanently damaged by over-staking, so don’t leave those ties on longer than necessary.
💧 Step 5: Monitor and Maintain the System
Check the protection layers monthly for gaps, tears, or pest activity. Replace damaged hardware cloth or wrap immediately. Water deeply once a week (unless it rains) to keep the root zone moist but not soggy. You’ll see the best results when the soil feels damp 2 inches down—like a wrung-out sponge.
In winter, add a light layer of mulch (1-2 inches) to insulate roots from freezing temperatures. Avoid heavy snow buildup on the wrap, as it can cause rot. With consistent care, your tree will outgrow most threats within 3-5 years, and you’ll have a sturdy, healthy addition to your landscape.
Tips & tricks for perfect new tree protection
These simple but game-changing strategies will help your young tree thrive from day one.
Material Selection: When choosing hardware cloth, opt for galvanized or coated mesh to prevent rust over time. The 1/4-inch mesh is perfect for most pests, but for areas with aggressive gophers, consider 1/8-inch mesh—it’s worth the extra cost. For the burlap layer in Step 1, use heavy-duty landscaping fabric instead if available; it lasts longer and resists tearing better than traditional burlap.
Installation Precision: In Step 1, mark the 4-foot diameter circle with landscape paint before digging to ensure perfect placement. The hardware cloth should extend 12 inches outward from the trunk—this prevents rodents from digging around the edges. I’ve seen too many trees fail because the barrier was too small. Bend that top edge outward aggressively; it’s the difference between a deterrent and an invitation for critters.
Trunk Wrap Longevity: For Step 2, if you’re using cardboard tubes, seal the seams with waterproof tape before painting. This prevents moisture from seeping in and causing rot at the base. The 2-foot height is non-negotiable—rodents and lawnmowers target exactly that zone. Pro tip: Paint the wrap with white latex paint before installing; it’s easier to work with when flat.
Mulch Application: In Step 3, use a rake to create a gentle slope when spreading the 3 inches of organic mulch. This helps water drain away from the trunk while still insulating roots. I’ve noticed that mulch breaks down unevenly—refresh the outer ring first in spring, then work your way inward. And that 6-inch gap from the trunk? Measure it with a ruler to be precise. Too close, and you risk suffocating the roots.
Pro Tips for New Tree Protection
- These simple but game-changing strategies will help your young tree thrive from day one.
- Material Selection: When choosing hardware cloth, opt for galvanized or coated mesh to prevent rust over time. The 1/...
- Installation Precision: In Step 1, mark the 4-foot diameter circle with landscape paint before digging to ensure perf...
Frequently asked questions
Got questions about safeguarding your trees with a layered barrier system? You’re not alone! Here are some of the most common concerns—and straightforward answers—to help you get started with confidence.
What’s the best time of year to install tree protection barriers?
Install barriers before high-risk seasons like winter (to prevent snow compaction) or early spring (to shield roots during thawing). Avoid extreme heat or drought—aim for mild fall or early spring for ideal soil conditions. Pro tip: If you’re protecting young trees, set up barriers immediately after planting for the best defense!
Do I need professional help, or can I DIY the installation?
Many homeowners DIY with basic tools, but complex setups (like deep root barriers or heavy-duty trunk wraps) may need a pro. If your tree is mature or the site is uneven, consult an arborist to avoid damage. For simple systems, follow manufacturer guidelines—just take your time!
What are some alternatives to physical barriers for tree protection?
If barriers aren’t feasible, try:
- Mulch rings (3–4 inches deep) to retain moisture and deter foot traffic.
- Root-friendly landscaping (e.g., ground covers instead of lawns).
- Tree guards (flexible plastic wraps) for trunks.
- Drip irrigation to keep soil stable.
How do I fix a barrier that’s already damaged or ineffective?
Check for gaps, rust, or shifts in your system. For root barriers, patch holes with soil or bendable metal plates. If the trunk wrap is loose, tighten straps or replace it—never use wire that can girdle the tree. Warning: Avoid over-tightening; leave room for trunk expansion.
Are tree protection barriers worth the investment long-term?
Barriers reduce maintenance costs (less pruning/replacement) and preserve property value** by preventing root damage from construction or foot traffic. For high-value trees, the ROI is clear—think of it as insurance for your green investment.
Wrapping up and next steps
Protecting your trees with a layered barrier system is a game-changer for their long-term health and resilience! 🌳 By safeguarding both roots and trunks, you’re investing in sustainable growth and preventing costly damage. Whether you’re a gardening enthusiast or a homeowner, this method is simple, effective, and worth the effort.
Ready to take action? Start by assessing your trees’ needs, gathering the right materials, and implementing the barriers step by step. Your trees—and future generations—will thank you! 🌱