
Fertilization
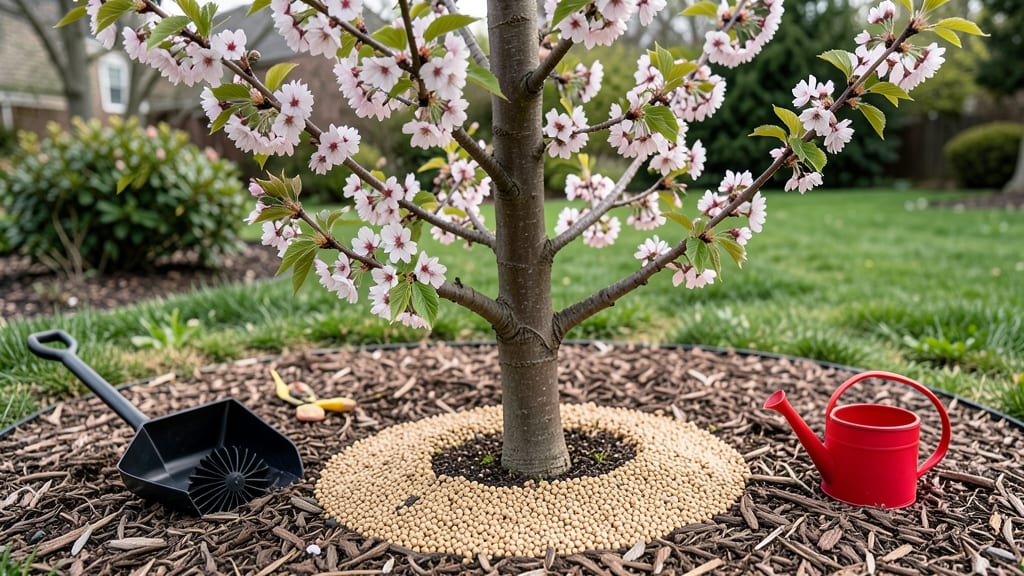
Spring tree fertilization unlocks the secret to stronger roots and fuller canopies—when roots wake up hungry, they soak up nutrients like never before. 🌳 I learned the hard way that timing matters: applying fertilizer too early or too late means wasted money and stressed trees.
The key is feeding them just as they break dormancy, before new leaves even appear.
You’ll need the right fertilizer for your tree type—deciduous trees love slow-release granular options, while evergreens prefer liquid feeds that won’t burn their needles. Organic choices like compost or bone meal work wonders for long-term health, but synthetic fertilizers deliver faster results if your tree looks weak.
Just avoid anything with too much nitrogen after bud break, or you’ll end up with lush leaves and no fruit.
By mid-spring, you’ll see the difference: deeper green foliage, thicker branches, and roots that stretch farther into the soil. The best part? Trees fertilized in spring need less watering later because their roots grow stronger, making them drought-resistant. That said, overdoing it can burn roots—so less is often more.
Works for backyard shade trees, fruit trees, or even young saplings—just adjust the amount based on trunk size. Here’s how to do it without guessing.
📚 In This Guide
- What you need
- Instructions
- Tips and common mistakes
- Wrapping up and next steps
What you need
- ● Slow-release fertilizer: Choose a balanced, organic option (e.g., 10-10-10 or 12-4-8 NPK ratio) or a tree-specific blend (10–20 lbs per 100 sq ft of root zone).
- ● Soil test kit: A DIY kit (e.g., Luster Leaf or LaMotte) to check pH and nutrient levels before fertilizing.
- ○ Garden hose with spray nozzle: For even water distribution (optional but helpful for dissolving granular fertilizers).
- ● Gloves & knee pads: Protect your hands and joints during application.
- ● Measuring scoop or spreader: A calibrated spreader (e.g., Scotts Turf Builder) for precise fertilizer distribution.
- ○ Shovel or trowel: For light soil aeration (optional but recommended for compacted soil).
- ● Watering can (5+ gallons): To activate granular fertilizers post-application.
- ● Rain gauge or forecast check: Avoid fertilizing 24–48 hours before rain to prevent runoff.
- ● Tree identification guide: To match fertilizer needs (e.g., acid-loving vs. alkaline-tolerant species).
- ● Mulch (2–4 inches): Organic mulch (pine straw, wood chips) to retain moisture and regulate soil temp.
- ● Soil conditioner: Compost or peat moss (1–2 inches) to improve soil structure.
- ● Tree banding tape: To mark application zones and avoid over-fertilizing.
- ● pH adjuster: Lime (for acidic soil) or sulfur (for alkaline soil) if soil test recommends it.
Step-by-step instructions for spring tree fertilization
Here's how to feed your trees the right way for vibrant growth this season—without overdoing it.
🌱 Step 1: Test Soil and Choose the Right Fertilizer
Before you add anything, grab a small soil sample from around the tree's drip line (about 6 inches deep) and send it to your local extension office for a test. This tells you exactly what nutrients your tree is missing. For most trees, a balanced 10-10-10 or 20-20-20 fertilizer works well, but evergreens often need more nitrogen—look for a 30-10-10 instead.
I always check the fertilizer label for slow-release options. Fast-acting fertilizers can burn roots, while slow-release feeds your tree steadily over 3-6 months. Organic choices like composted manure or fish emulsion work too, but they need to be applied thicker—about ½ inch spread over the root zone.
💧 Step 2: Water the Soil Before Applying Fertilizer
Water the area around the tree deeply the day before fertilizing. You want the soil to be moist but not soggy—think of a wrung-out sponge. This prevents fertilizer from sitting too close to the roots and causing burn. If your soil is dry, give it a slow, deep watering that penetrates at least 12 inches down. You'll know it's right when water pools slightly at the base but doesn't run off.
I like to use a soaker hose for this step—it delivers water evenly without disturbing the soil surface. Avoid overhead sprinklers, which can wash fertilizer away before it has a chance to work.
✂️ Step 3: Apply Fertilizer in the Correct Pattern
Spread the fertilizer in a donut shape around the tree, starting 6 inches away from the trunk and extending to the drip line (the outer edge of the tree's canopy). This mimics how tree roots naturally spread outward. For young trees, use a smaller circle—about 12 inches wide. For mature trees, the donut should be 3-4 feet wide. Never apply fertilizer directly against the trunk; this can harm the bark and attract pests.
Work the fertilizer lightly into the top 2 inches of soil with a rake or hoe. This helps it dissolve evenly and prevents it from washing away with the next rain. If you're using granular fertilizer, spread it sparingly—too much can overwhelm the tree. A good rule is ½ pound of fertilizer per inch of trunk diameter for mature trees.
☀️ Step 4: Water Again Immediately After Application
Right after spreading the fertilizer, water the area thoroughly again. This activates the nutrients and washes them into the soil where roots can absorb them. Use a slow, steady stream—you want the water to penetrate 6-12 inches deep. If you're using a hose, let it run until water begins to pool at the base. For larger trees, this might take 15-20 minutes per section.
Here's the thing—don't skip this step. Without proper watering, fertilizer can sit on the soil surface and burn the roots. You'll see signs of over-fertilization in 3-5 days: yellowing leaves, brown leaf edges, or stunted growth. If this happens, flush the soil with extra water to dilute the excess nutrients.
⏰ Step 5: Monitor and Repeat as Needed
Watch your tree for 4-6 weeks after fertilizing. Healthy growth looks like new leaves emerging, faster canopy expansion, and darker green foliage. If you notice slow growth or pale leaves, it might need another light feeding in late summer (just before new growth starts). For evergreens, a second application in early fall can help them prepare for winter.
I always keep a gardening journal to track when and how I fertilized each tree. Note the type of fertilizer, how much you used, and any changes in the tree's appearance. This helps you adjust next year—maybe your oak needs more nitrogen, or your maple responds better to organic options. Trees are like us: they thrive when we pay attention to their needs.
Tips & tricks for perfect spring tree fertilization
These simple tips will help you avoid common mistakes and get the most out of your tree's nutrient boost.
Soil Test Timing: If you can't send your soil sample to an extension office right away, do a quick at-home test using a DIY soil test kit. These usually take about 24 hours and give you basic pH and nutrient information. I've used them before when I needed faster results—just remember they're less precise than lab tests. The key is knowing your soil's starting point before you add any fertilizer.
Fertilizer Application Pattern: For young trees, I like to draw a small circle on the ground with a stick to visualize the 12-inch wide donut shape. This helps me stay precise with the 6-inch distance from the trunk. For mature trees, use a garden hose laid out in a circle to mark the 3-4 foot wide zone. This visual guide prevents over-application near the trunk where roots are most vulnerable.
Watering Technique: The 15-20 minutes of watering time for larger trees might seem long, but it's worth it. I use a timer on my hose to avoid overwatering or forgetting. You'll know you've done it right when water appears at the base but doesn't create a puddle. This deep watering ensures nutrients reach the root zone where they'll do the most good.
Monitoring Growth: When checking for healthy growth after 4-6 weeks, look at the new leaves that emerge after fertilization. They should be noticeably darker green and larger than the previous year's foliage. I also check the leaf edges—if they're crisp and green rather than brown or yellow, that's a good sign your tree is thriving from the nutrients.
Pro Tips for Spring Tree Fertilization
- These simple tips will help you avoid common mistakes and get the most out of your tree's nutrient boost.
- Soil Test Timing: If you can't send your soil sample to an extension office right away, do a quick at-home test using...
- Fertilizer Application Pattern: For young trees, I like to draw a small circle on the ground with a stick to visualiz...
Frequently asked questions
Got questions about spring tree fertilization? You’re not alone! Here are answers to the most common concerns—so you can give your trees the best start this season.
When is the best time to fertilize trees in spring?
The ideal window is late winter to early spring, just as new growth begins (usually February–April, depending on your climate). This timing ensures nutrients are available for root development and bud break. Avoid fertilizing during extreme heat or drought—wait until soil is moist and temperatures stabilize.
How do I know if my tree needs fertilizer?
Watch for these signs: yellowing leaves, stunted growth, thin canopy, or excessive leaf drop. A simple soil test (available at garden centers) can confirm nutrient deficiencies. Healthy trees with vibrant foliage and steady growth may not need extra fertilizer—focus on mulch and water instead!
Can I use organic vs. synthetic fertilizer—what’s the difference?
Both work, but they feed trees differently. Synthetic fertilizers (like 10-10-10) provide quick, concentrated nutrients. Organic options (compost, manure, or bone meal) improve soil long-term and support microbial life. For young trees or poor soil, a mix of both often yields the best results.
What should I do if my tree’s leaves turn brown after fertilizing?
Brown leaves can signal over-fertilization (too much salt) or burned roots. Flush the soil with water to dilute excess nutrients, and avoid fertilizing for 6–8 weeks. If the issue persists, reduce fertilizer strength by half next time. Pro tip: Always follow label instructions and water thoroughly after applying!
How often should I fertilize mature trees?
Mature trees typically need fertilization every 2–3 years, while young or newly planted trees benefit from annual feeding. Focus on slow-release or organic fertilizers to prevent overfeeding. Pair fertilization with deep watering and mulching (2–4 inches of organic mulch) to maximize nutrient uptake.
Wrapping up and next steps
Spring is the perfect time to give your trees the nutrients they need to thrive—healthy roots, vibrant foliage, and stronger growth are just a season away! 🌱 By choosing the right fertilizer (organic, synthetic, or slow-release) and applying it correctly, you’re setting your trees up for long-term success. Don’t wait—your trees will thank you with lush canopies all year!
🌟 Next Steps: Take Action Now!
Ready to see results? Mark your calendar for early spring (before buds bloom) and gather your supplies. Start with a soil test if unsure, then follow the steps above for root-boosting nutrition. Happy fertilizing—your trees (and future shade!) will love you for it! 🌳✨